Do you want to split a PDF into several files, delete or pull out single pages, turn sideways pages upright, change the page order or add page numbers? PDF24 does all of this for free: online in your browser or offline with PDF24 Creator for Windows.
The tools online and in the PDF24 Toolbox copy the pages unchanged when you split, delete, extract, rotate or sort. Text, images and fonts keep their quality.
Contents
- Which way suits you?
- Split a PDF: step by step
- Split a PDF offline: Toolbox and File Explorer
- Split very large PDFs
- Delete pages
- Extract pages
- Rotate pages and save the rotation
- Rearrange, reverse and insert pages
- Merge front and back scans (zipper method)
- Remove or insert blank pages
- Add page numbers
- Remove page numbers
- Everything in one window: editor, Assemble PDF, Creator, Reader
- From the command line
- Problems and solutions
Which way suits you?
There is a tool for each task, online and with the same layout in the PDF24 Toolbox:
- Divide a PDF into several files: Split PDF → Split
- Remove pages: Remove PDF pages → Delete
- Keep only certain pages: Extract PDF pages → Extract
- Rotate pages: Rotate PDF pages → Rotate
- Change the order: Rearrange PDF pages → Rearrange
- Page numbers: Add page numbers → Page numbers
The online tools work on Windows, Mac, Linux, iPhone and Android. If your files must not leave your PC, use the PDF24 Toolbox from the free PDF24 Creator; its tools have almost the same names and work without the internet. Several steps on one file are easier in one window.
Split a PDF: step by step
- Open Split PDF.
- Click "Choose files" or drag the PDF into the file box. Several PDFs are split the same way.
- Choose the "Mode" (see below).
- Click "Split".
- Download the result. The parts come together in a ZIP file.
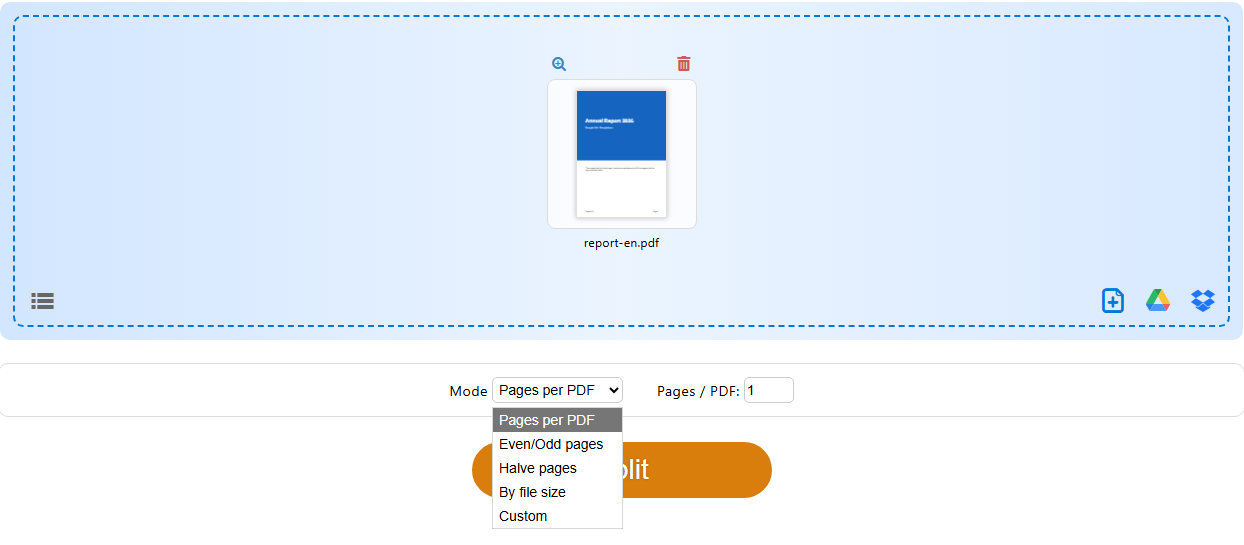
The modes
- "Pages per PDF" (default): the number is set in the field "Pages / PDF:", 1 at first: then every page becomes a PDF of its own. With 2 you split, for example, a mail merge of two-page letters into single letters.
- "Even/Odd pages": two files, one with the odd pages (1, 3, 5 …) and one with the even pages (2, 4, 6 …).
- "Halve pages": cuts every page in the middle, e.g. scanned double pages (more).
- "By file size": each part is at most as large as set in "Maximum size" (in MB, default 10), e.g. for a portal with a size limit. A page that is larger than that on its own goes into a file of its own; PDF24 names it below the result.
- "Custom": click the scissors between two pages in the preview to split there, or use the field "Split after pages": "3, 10" splits after page 3 and after page 10, which gives the ranges 1–3, 4–10 and 11 to the end. "Toggle cut points" toggles all cut points; with none set, it splits after every page. The "Split" button shows how many PDFs you will get.
What the parts are called
Each part is named after its pages, e.g. "01-05.pdf" for pages 1 to 5 (from 10 pages on with leading zeros, so that the files sort correctly). With "Pages per PDF" 1, only the page number is in the name, e.g. "07.pdf". "Even/Odd pages" gives "odd.pdf" and "even.pdf". If there is only one part, you get a PDF instead of a ZIP file.
PDF24 cannot split or name the parts by the content of their pages (such as an invoice number) or by bookmarks. Rename the parts after splitting – in the Toolbox even before saving, with the pencil icon "Edit file name" on the part's entry in the result list. Only single pages as a new PDF? Use Extract pages.
Split a PDF offline: Toolbox and File Explorer
In the PDF24 Toolbox, open "Split PDF", load the PDF, choose the "Mode" (the same as online; "By file size" since version 11.34.0) and click "Split" and "Save". With several parts, PDF24 creates a subfolder in the chosen folder, named like the original file (e.g. "Report.pdf"). The parts are named like the original file plus the page range, e.g. "Report-01-05.pdf".
With a right-click in File Explorer, every page separately: right-click the PDF and choose "PDF24" (on Windows 11 in the new context menu or under "Show more options"), then "Split page by page" in the File Tools window (depending on the installation, the command is directly in the "PDF24" submenu). PDF24 asks for a name and creates a folder named like the chosen file, e.g. "Report.pdf" (a folder, not a PDF), with every page as a PDF of its own, e.g. "Report-0001.pdf". Every page is written anew; form fields become fixed text. For forms, use "Split PDF" in the Toolbox with "Pages per PDF" 1. This is fixed and comes with the next version: form fields, comments and links will then be kept.
PDF24 Creator has no split command, but you can drag pages into a new, blank document (Creator).
Split very large PDFs
- Online, a file may be up to 1,000 MB. Offline there is no fixed limit; since version 11.34.0 the Toolbox also splits books of several hundred MB that used to stop with an out-of-memory error. So update PDF24 Creator first.
- For thousands of pages, use "Pages per PDF" or "By file size". "Custom" shows a preview of every page; with very large files this takes long, and previews may stay white. First split into manageable parts, e.g. 500 pages, and work on those.
Delete pages
- Open Remove PDF pages (offline in the Toolbox: "Remove PDF pages") and load the PDF.
- "Click on a page in order to remove it". Hold the Shift key to mark all pages between two clicks.
- For many pages, use the icons above the pages, e.g. "Toggle page marks", "Mark even pages" and "Mark odd pages" (in the Toolbox: "Select even pages", "Select odd pages").
- Click "Create PDF" and download or save the new PDF.
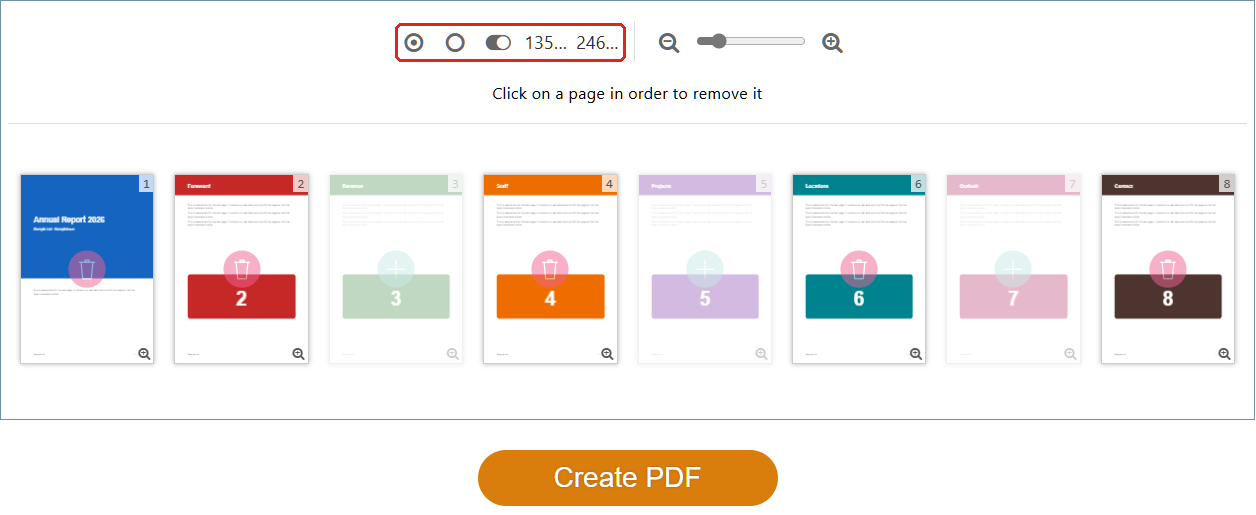
Only a few pages should stay? Mark them and click "Toggle page marks", or use Extract pages: there you type the pages, e.g. "1-5, 8". In PDF24 Reader and PDF24 Creator, right-click the page › "Delete" and then save (more).
Bookmarks: online, removing and extracting pages keeps the bookmarks of the remaining pages. In the Toolbox, both still remove all bookmarks of the PDF in PDF24 Creator 11.34 (fixed, comes with the next version). If you need them there, take over the pages you want in the page mode of Merge PDF, which keeps the bookmarks of those pages (more on bookmarks).
Extract pages
Extracting makes a new PDF from the pages you choose. The original file stays as it is.
- Open Extract PDF pages (offline in the Toolbox: "Extract PDF pages") and load the PDF.
- "Click on a page in order to extract it", or enter the pages in the "Pages" field, e.g. "1-5, 8, 11-13". The marking icons are the same as for deleting, including even and odd pages.
- Click "Extract pages" and download the new PDF.
You get one PDF with all the chosen pages, with several PDFs loaded one per file. If every page should become a file of its own, use Split PDF with "Pages per PDF" 1. Other ways: in File Explorer, right-click › "PDF24" › "Extract pages"; in PDF24 Reader, right-click › "Extract". To put pages from several PDFs into one new PDF, use page mode in Merge PDF.
Rotate pages and save the rotation
- Open Rotate PDF pages (offline in the Toolbox: "Rotate PDF pages") and load the PDF.
- Rotate all pages with "Rotate pages counterclockwise" or "Rotate pages clockwise", or click a single page: each click turns it 90° clockwise.
- Click "Create PDF" and download the new PDF.
The rotation is then stored in the file and every PDF program shows it that way.
Rotate and save in PDF24 Reader
The "Rotate left" and "Rotate right" buttons in the Reader's toolbar only rotate the view; the next time you open the file, the page is back as before. To save the rotation:
- Choose the "Organize pages" mode in the toolbar.
- Right-click the page and choose "Rotate right" or "Rotate left". To rotate several pages, mark them first with Ctrl or Shift. A right-click next to the pages offers "Rotate all pages right" and "Rotate selected pages right".
- Click "Save".
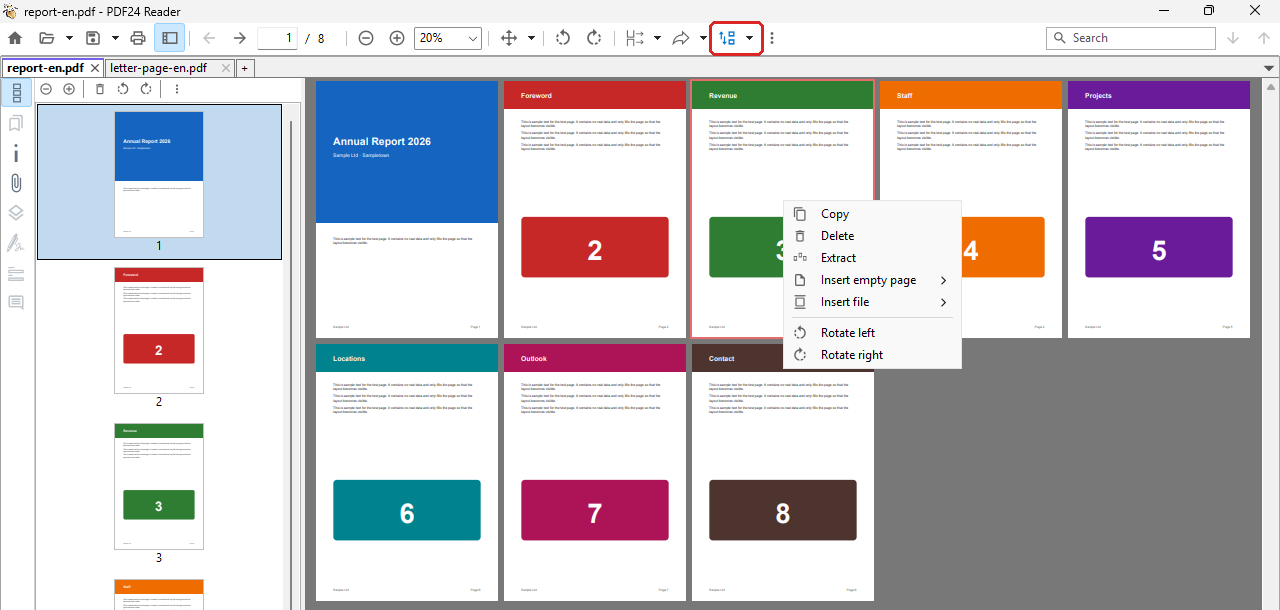
Rotate in PDF24 Creator
Mark the pages, right-click them and choose "Rotate page" › "90°" (clockwise) or "-90°" (counter-clockwise); "180°" turns a page upside down. The toolbar buttons "Rotate 90° clockwise" and "Rotate 90° counter-clockwise" rotate whole documents – the selected ones or, if none is selected, all in the list. Then save the document.
If PDF24 turns pages differently from how you rotated them when saving or printing, see Portrait and landscape.
Turn scanned pages upright automatically
If many scanned pages are sideways or upside down, text recognition rotates them by the recognized text: online in PDF OCR behind the gear icon ("Additional options") with "Rotate pages", offline in the PDF24 OCR program with "Auto rotate pages".
Rearrange, reverse and insert pages
- Open Rearrange PDF pages (offline in the Toolbox: "Sort PDF pages") and load the PDF.
- Drag the pages to their new place with the mouse.
- To reverse the whole order: "Select sorting method" › "From back to front". The last page becomes the first.
- Click "Create PDF" (in the Toolbox: "Create sorted PDF").
With many pages, make the previews smaller in the Toolbox with the slider or Ctrl and the mouse wheel. In PDF24 Reader, drag the pages to their new place in the "Organize pages" mode and click "Save".
Insert pages from another PDF: online and in the Toolbox with page mode in Merge PDF, in PDF24 Reader with a right-click › "Insert file", online also in the editor and in Assemble PDF.
Merge front and back scans (zipper method)
If your scanner scans only one side, you have two files: the front pages and the back pages, usually in reverse. Online you merge them in Assemble PDF: load both files, click "Reverse the page order" on the back-pages document, then "Merge alternately" and "Save". Offline, PDF24 Creator and the Toolbox do this too. All steps are on the page Merge PDF.
Remove or insert blank pages
Remove blank pages: PDF24 currently has no tool that detects and deletes blank pages automatically. Remove blank pages, e.g. the empty backs of a double-sided scan, with Remove PDF pages: in the page preview, blank pages stand out at once. If all backs are empty, scan one-sided in future.
Insert blank pages, e.g. so that each chapter starts on a front page in double-sided printing: in Merge PDF with "Insert blank pages" ("Always" or "On odd page count"), in PDF24 Creator with a right-click on a page › "Insert blank page before" or "Insert blank page after", in PDF24 Reader with a right-click › "Insert empty page", online also in the editor and in Assemble PDF.
Add page numbers
- Open Add page numbers and load the PDF.
- Set the "Pattern".
{NUM}stands for the page number,{CNT}for the last number – without other settings, the number of pages. The default is "{NUM} / {CNT}", i.e. "3 / 10". For "Page 3 of 10" writePage {NUM} of {CNT}, for a plain number just{NUM}. The online tool also understands the Toolbox spellings{NUMBER}and{COUNT}. - Choose the "Position" (default: "bottom, center") and the "Font size". More settings are behind the gear icon ("Additional options").
- Click "Add page numbers" and download the PDF.
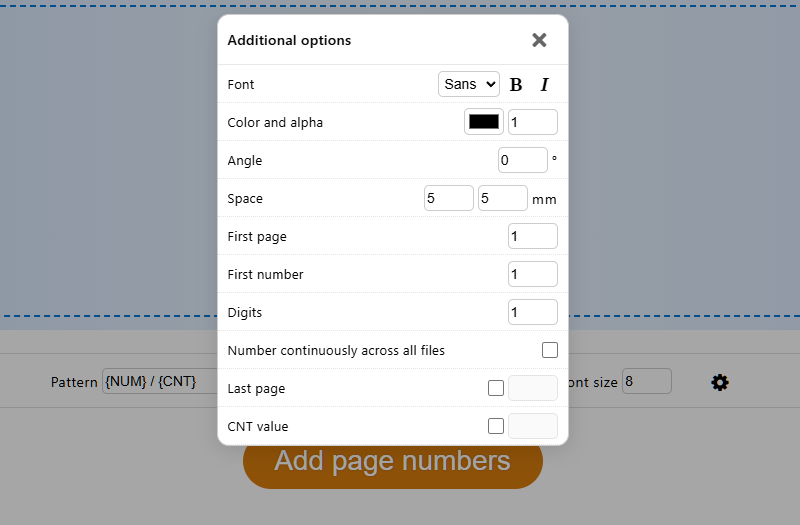
Additional options
- "First page": numbers are added from this page on. With 2, for example, the cover page stays without a number.
- "First number": the number on the first numbered page; counting goes on from there.
- "Last page": tick the box and enter the page where numbering ends. Without the tick, up to the end.
{CNT}is then (without "CNT value") the number on this last numbered page. - "CNT value": a fixed number for
{CNT}, e.g. the total of a larger document. - "Digits": pads the numbers with leading zeros, e.g. 6 gives 000001.
- "Number continuously across all files" (with several files): each file continues after the last number of the previous one, in the order of the file list.
{CNT}then counts all files together. - Also: "Font", "Color and alpha" (opacity), "Angle" and "Space" from the edge in mm.
Examples (PDF with 10 pages):
- Cover page without a number, the second page shows 2: "First page" 2, "First number" 2 ("2 / 10").
- Cover page without a number, counting starts at 1 after it: "First page" 2, "First number" 1.
{CNT}then only counts the numbered pages ("1 / 9"); for "/ 10" enter 10 in "CNT value". - An appendix that continues at page 51: "First number" 51 ("51 / 60").
In the PDF24 Toolbox (offline)
The tool is called "Add page numbers"; the less common options are behind the gear icon here too. Differences from online:
- The default is "{NUM} / {COUNT}".
{COUNT}and{CNT}mean the same and work online and offline. - Instead of "First number" there is "Offset": it is added to the count, the first numbered page shows 1 + offset. Counting from 51: offset 50. Cover page without a number, second page shows 2: "First page" 2, "Offset" 1. Negative values are not possible.
- "Last page" and "CNT value" are not available in the Toolbox yet; both come with the next version (there as "Last page" and "Value for {COUNT}"). If numbering should end earlier, use the online tool until then or split off the appendix first.
- "Digits" and "Number continuously across all files" exist in the Toolbox since version 11.34.0.
In the online editor and when printing
In the editor you add page numbers in the "Add page numbers" mode and see the result on the pages right away. There is also a "Number format" with Roman numerals (i, ii, iii or I, II, III) and letters (a, b, c or A, B, C), e.g. for a preface.
When you print to the PDF24 printer, you can add page numbers right when saving: in the PDF24 Assistant, "Save as..." › PDF › "Page Numbers" › "Use page numbers".
Remove page numbers
PDF24 has no tool that finds and removes existing page numbers. These ways help:
- Change the original: if the PDF was made from Word or another program, remove the page numbers there and create the PDF again.
- Cut off the margin: if the page number stands alone in the margin, cut the margin off with Crop PDF, e.g. 15 mm at "Bottom". The number is then hidden, not deleted (more).
- Cover with white: with Redact PDF in the color "White" the number is gone for good, but the page is saved as an image (more).
Then add new page numbers with Add page numbers.
Everything in one window: editor, Assemble PDF, Creator, Reader
For several changes to one PDF, these ways save you switching between tools.
Online editor, "Organize" mode
Open Edit PDF and, at the top, choose the "Organize" mode with the button showing the name of the mode ("Insert" when the editor opens). There you move pages by drag & drop, rotate, duplicate and delete them on the page itself ("Restore" brings a deleted page back), add content between the pages with "Insert PDF or images" and "Insert blank page", and keep a range like "1-3, 7" under "Extract pages" with "Keep only these pages". Splitting works in the "Split PDF" mode. Save with "Save PDF" (more).
Assemble PDF: several documents at once
Assemble PDF shows several files side by side. You also drag pages from one document into another, split a document with "Split here" and put documents one after the other with "Merge". "Save" makes each document a PDF of its own.
PDF24 Creator (offline)
PDF24 Creator ("Organize PDFs" in the Toolbox) shows your documents with page previews. Drag pages to another place or into another document; a right-click on a page offers "Delete", "Rotate page" and blank pages before or after. More, also on saving without recalculation: Merge PDF.
PDF24 Reader (offline)
Open the PDF in PDF24 Reader and choose the "Organize pages" mode in the toolbar. You mark pages like files in File Explorer (click, Ctrl+click, Shift+click) and move them by dragging; drag another PDF or images from File Explorer between the pages. A right-click on a page offers "Delete", "Extract" (the Reader asks for a file name), "Copy" and the rotate commands, for a single page also "Insert empty page" and "Insert file" with "Before the page" or "After the page". "Save" writes the changes to the file. Splitting and adding page numbers are not possible in the Reader; use the Toolbox for those.
From the command line
The PDF24 DocTool can do some of these tasks without a window:
"C:\Program Files\PDF24\pdf24-DocTool.exe" -splitByPage -outputDir "C:\Scans\Pages" "C:\Scans\Report.pdf"-splitByPagesplits each PDF into single pages. They go into a folder "Report.pdf" in the output folder, as "Report-0001.pdf" and so on. As with the File Explorer command, form fields become fixed text (fixed, comes with the next version).-autoRotatePagesturns pages upright according to the direction of their text; pages without text stay as they are.
Other kinds of splitting, deleting, sorting and page numbers are not available on the command line. All switches are in the manual.
Problems and solutions
The rotated page is wrong again after saving or reopening
- PDF24 Reader: rotate and save in the "Organize pages" mode, not with the toolbar buttons (Reader).
- If PDF24 Creator turns pages back when saving, see Portrait and landscape.
- Online: open the new file you downloaded, not the original. The new file has the same name as the original, in the download folder often with "(1)" added.
"Split", "Create PDF" or "Extract pages" cannot be clicked
Online the button is locked until the file is uploaded and the preview is ready. For deleting and extracting, at least one page must also be marked.
The Toolbox shows an error or produces no result
Since version 11.34.0 the Toolbox names the reason, e.g. a damaged file (Repair PDF). "Remove PDF pages", "Extract PDF pages", "Add page numbers" and, when splitting, the modes "Even/Odd pages", "Halve pages" and "By file size" need the component "OpenJDK (GPL)". If it was deselected during installation, run the setup again and select it. For out-of-memory errors, see PDF24 Creator troubleshooting.
Splitting creates a subfolder
That is how the Toolbox works when you save all parts at once: each split file gets a subfolder of its own. To save a part without a subfolder, use the save icon ("Save file") on its entry in the result list.
Page numbers don't come out as expected
- Use
{CNT}or{COUNT}for the total – both work online and in the Toolbox. - If numbering starts in the wrong place or the total is wrong, check "First page", "First number" or "Offset" and "CNT value" (examples).
- If the number covers text, choose another "Position" or a larger "Space".
Page numbers appear when converting a text or Word file
The page numbers then come from the program that prints the file, e.g. the header and footer in Word. Switch them off in its page setup and convert the file again.
If you are missing a feature or something doesn't work, write to us at team@pdf24.org or ask in the PDF24 forum.